Integrating Apache Camel with Raspberry Pi for IoT
The Internet of Things (IoT) is reshaping how software interacts with the physical world. At the core of many IoT projects sit two building blocks: affordable hardware and flexible integration software. This article explores how to combine the Raspberry Pi with Apache Camel, an enterprise integration framework, to build IoT solutions bridging the physical and digital worlds.
Introduction to the Technologies
The Raspberry Pi is a credit card-sized computer that costs $35. With over five million units sold, it has become a reference platform among hobbyists, educators, and professional developers. While the Raspberry Pi Foundation’s primary goal was to provide an affordable computer for education, many electronics enthusiasts have adopted it for home automation, environmental monitoring, and other IoT applications.
Apache Camel is an Enterprise Integration Patterns (EIP) framework designed to connect, process, and route messages across various technologies and protocols. It provides a consistent API for integrating different systems, making it well suited for IoT applications that need to communicate with multiple services and devices.
This post demonstrates Apache Camel and Raspberry Pi integration as a proof of concept, showing how enterprise integration patterns can be applied to physical computing.
Raspberry Pi: Hardware for the Physical World
Raspberry Pi is a versatile single-board computer with features well suited for IoT:
|
|
|
Apache Camel: Integration Framework for the Digital World
Apache Camel is a robust integration framework:
|
|
|
The Project: Building a Simple IoT Application
This proof of concept demonstrates the integration between Apache Camel and Raspberry Pi through two prototypes:
- Timer-Controlled LED: a Camel route using a timer to toggle an LED at regular intervals
- Button-Controlled LED: a physical button press triggers the LED toggle
These examples showcase how Camel can process both time-based events and physical input events to control hardware outputs.
Prerequisites
Required components:
- A Raspberry Pi (available here)
- Tested with: Model B
- Compatible with: Models A, A+, B+, and 2B
- Raspbian OS (download)
- Electronic components:
- 1 LED (any color)
- 1 momentary push button
- 1 220 Ω resistor for the LED
- 4 jumper wires
- 1 breadboard
Setting Up the Hardware
Safety Warning: Always disconnect power before wiring. Double-check all connections before reconnecting to avoid damaging the Raspberry Pi or components.
Wiring diagram:
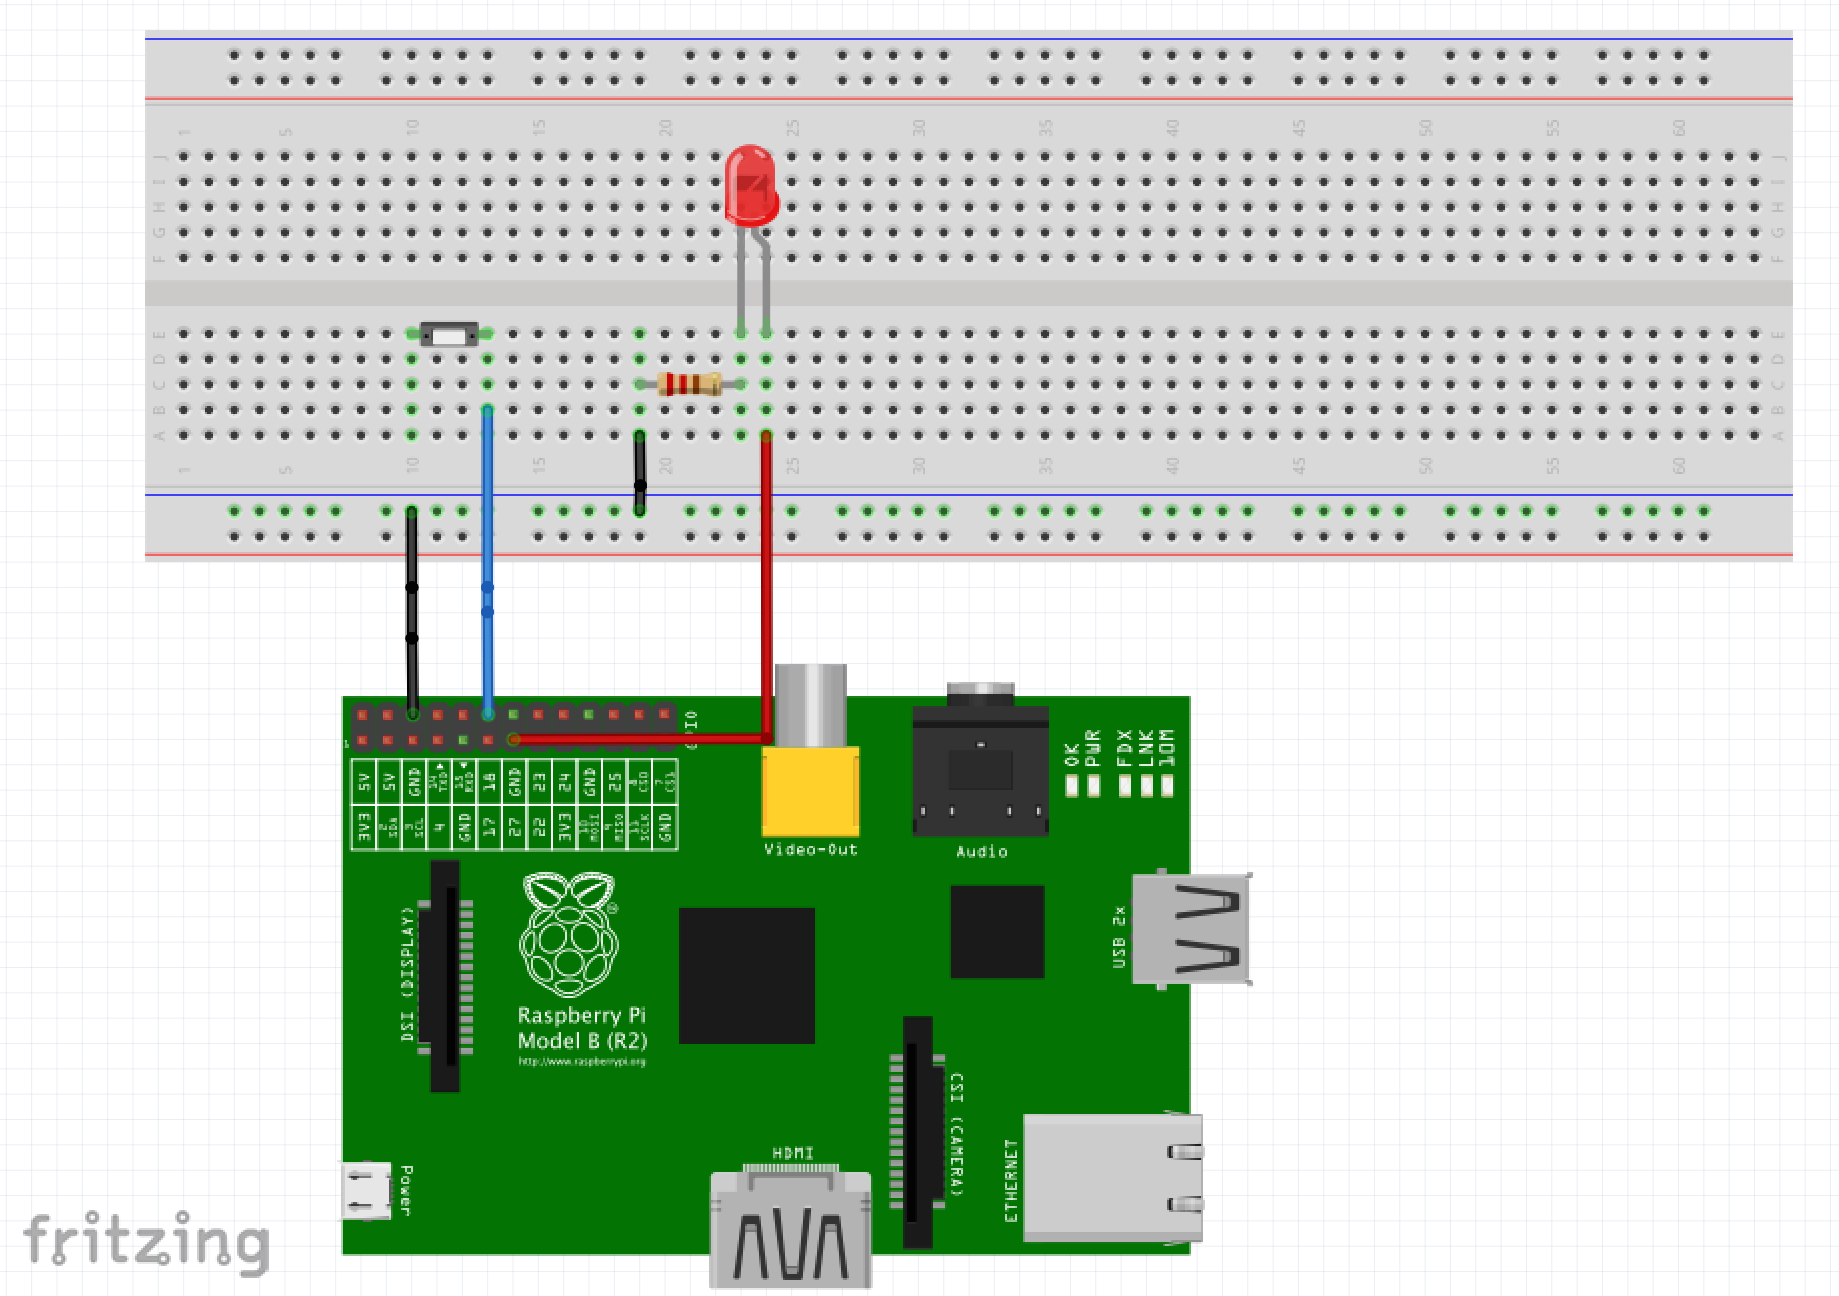
The circuit consists of:
- An LED connected to GPIO pin 2 (physical pin 3) with a 220Ω resistor in series
- A push button connected to GPIO pin 1 (physical pin 12)
The wiring can be tested with the wiringpi library before proceeding with the Camel integration.
Installing the Pi4J Library
Pi4J bridges Java with the Raspberry Pi’s GPIO pins. Currently, only the 1.0-RC version is available directly for Raspberry Pi:
$> ssh ${PI_USER}@${PI_HOST}
pi@rbpi> curl -s get.pi4j.com | sudo bash
Information
Setting up SSH with Public/Private key authentication eliminates the need to enter a password on each connection.
For more details, visit the Pi4J installation guide.
Compiling the Raspberry Pi Camel Component
The camel-raspberry component is still under development. Some aspects may change in future versions (URI format, available options).
Building on a development machine is more efficient than on the Raspberry Pi itself:
# Clone the repository
$> git clone https://github.com/camel-labs/camel-labs.git

# Navigate to the Raspberry Pi component directory
$> cd camel-labs/iot/components/camel-raspberrypi

# Build the component, skipping tests for faster compilation
$> mvn package -Praspberry -Dmaven.test.skip=true
Information
The camel-raspberrypi component is maintained in the camel-labs repository and has not yet been merged into the main Apache Camel codebase.
Creating the Test Application
A simple Java application sets up the Camel routes:
package com.github.camellabs.component.pi4j;

import org.apache.camel.CamelContext;
import org.apache.camel.builder.RouteBuilder;
import org.apache.camel.impl.DefaultCamelContext;
import org.slf4j.Logger;
import org.slf4j.LoggerFactory;

/**
 * A simple application to run RaspberryPi Camel routes
 */
public final class CamelMain {

    private static final Logger LOG = LoggerFactory.getLogger(CamelMain.class);

    private CamelMain() {
    }

    /**
     * Route builder that creates a route from command line arguments
     */
    public static class CommandLineRouteBuilder extends RouteBuilder {

        String[] args;

        CommandLineRouteBuilder(String[] args) {
            this.args = args;
        }

        @Override
        public void configure() throws Exception {
            // Create a route from the first argument to the second argument
            // with logging in between
            from(args[0]).id("raspberrypi-route").to(Pi4jConstants.LOG_COMPONENT).to(args[1]);
        }
    }

    public static void main(String[] args) throws Exception {
        LOG.info("main");

        // Log the command line arguments
        for (int i = 0; i < args.length; i++) {
            LOG.info("args[" + i + "] =" + args[i]);
        }

        // Create and configure the Camel context
        CamelContext context = new DefaultCamelContext();
        context.addRoutes(new CommandLineRouteBuilder(args));

        // Start the Camel context and let it run for 10 minutes
        context.start();
        Thread.sleep(600000);
        context.stop();
        System.exit(0);
    }
}
The program takes two command-line arguments:
- The source endpoint URI (where messages come from)
- The target endpoint URI (where messages go to)
A Camel route is created between these endpoints, with logging in between.
Deploying to the Raspberry Pi
Copy the compiled JAR files and dependencies to the Raspberry Pi:
# Navigate to the component directory
$> cd components/camel-raspberrypi

# Create a directory on the Raspberry Pi
$> ssh ${PI_USER}@${PI_HOST} 'mkdir -p /home/pi/camel'

# Copy the JAR files
$> scp target/*.jar ${PI_USER}@${PI_HOST}:/home/pi/camel
Configuring Logging
A log4j.properties file is needed in /home/pi/camel on the Raspberry Pi:
#
# The logging properties used
#
log4j.rootLogger=INFO, out

# uncomment the following line to turn on Camel debugging
#log4j.logger.org.apache.camel=DEBUG
log4j.logger.org.pi4j=ALL
log4j.logger.com.github.camellabs.component.raspberrypi=ALL

# CONSOLE appender not used by default
log4j.appender.out=org.apache.log4j.ConsoleAppender
log4j.appender.out.layout=org.apache.log4j.PatternLayout
log4j.appender.out.layout.ConversionPattern=%d{ISO8601} [%30.30t] %-30.30c{1} %-5p %m%n
#log4j.appender.out.layout.ConversionPattern=%d [%-15.15t] %-5p %-30.30c{1} - %m%n
Prototype 1: Timer-Controlled LED
The first prototype uses Camel’s timer component to toggle an LED at regular intervals.
Architecture
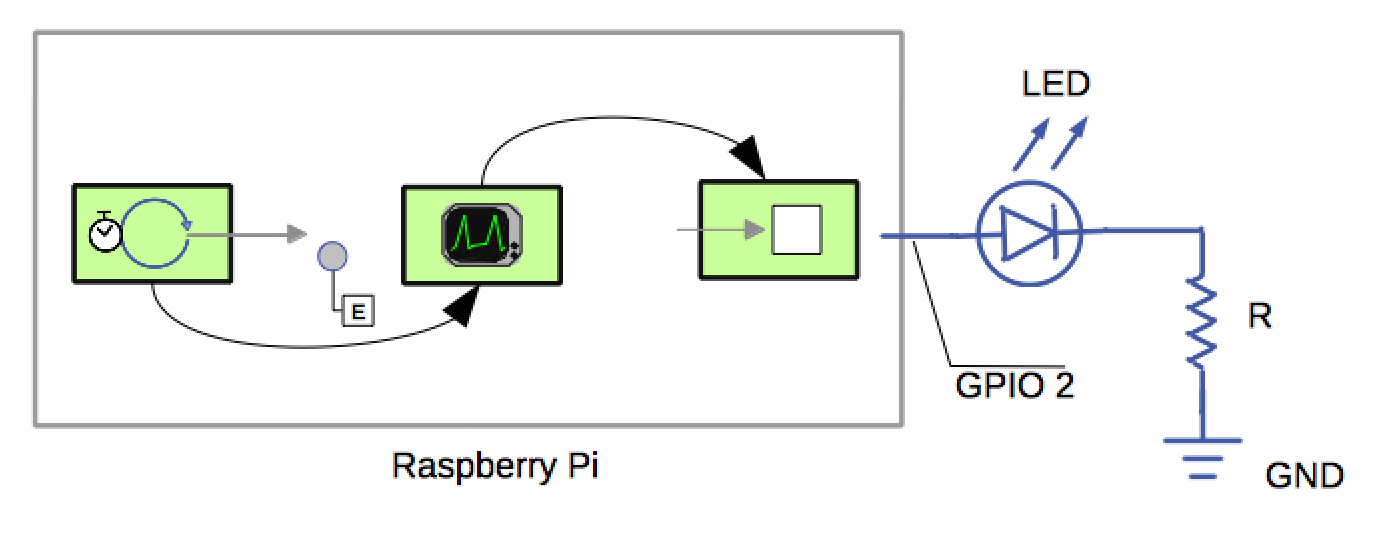
The flow:
- A Camel Timer generates a message every second
- The Camel route passes this message to the RaspberryPi GPIO component
- The GPIO component toggles the LED on GPIO pin 2
Running the Timer-LED Example
$> ssh ${PI_USER}@${PI_HOST}
pi@rbpi> pi4j -r com.github.camellabs.component.raspberrypi.CamelMain  \
        "timer://foo?fixedRate=true&repeatCount=60"  \
        "raspberrypi-gpio://2?action=TOGGLE&shutdownExport=true"
This command creates a timer endpoint firing every second for 60 iterations, routing each event to GPIO pin 2 with the TOGGLE action. The shutdownExport=true parameter ensures the GPIO pin is released on exit.
Video Demonstration: Timer-Controlled LED
Command Line Execution
Understanding the Console Output
When you run the timer example, you’ll see detailed logs showing:
- The Camel context starting up
- Timer events being generated
- Messages flowing through the route
- The GPIO pin being toggled
Here’s a snippet of the console output:
2015-03-31 19:53:51,863 [                          main] CamelMain                      INFO  main
2015-03-31 19:53:51,881 [                          main] CamelMain                      INFO  args[0] =timer://foo?fixedRate=true&repeatCount=600
2015-03-31 19:53:51,882 [                          main] CamelMain                      INFO  args[1] =raspberrypi-gpio://2?action=TOGGLE&shutdownExport=true
2015-03-31 19:53:55,306 [                          main] DefaultCamelContext            INFO  Apache Camel 2.16-SNAPSHOT (CamelContext: camel-1) is starting
...
2015-03-31 19:54:07,283 [mel-1) thread #0 - timer://foo] RaspberryPiProducer            DEBUG Exchange[Message: [Body is null]]
2015-03-31 19:54:07,285 [mel-1) thread #0 - timer://foo] RaspberryPiProducer            TRACE action= TOGGLE
Prototype 2: Button-Controlled LED
The second prototype replaces the timer with a physical button, creating an interactive application where a user action triggers a hardware response.
Architecture
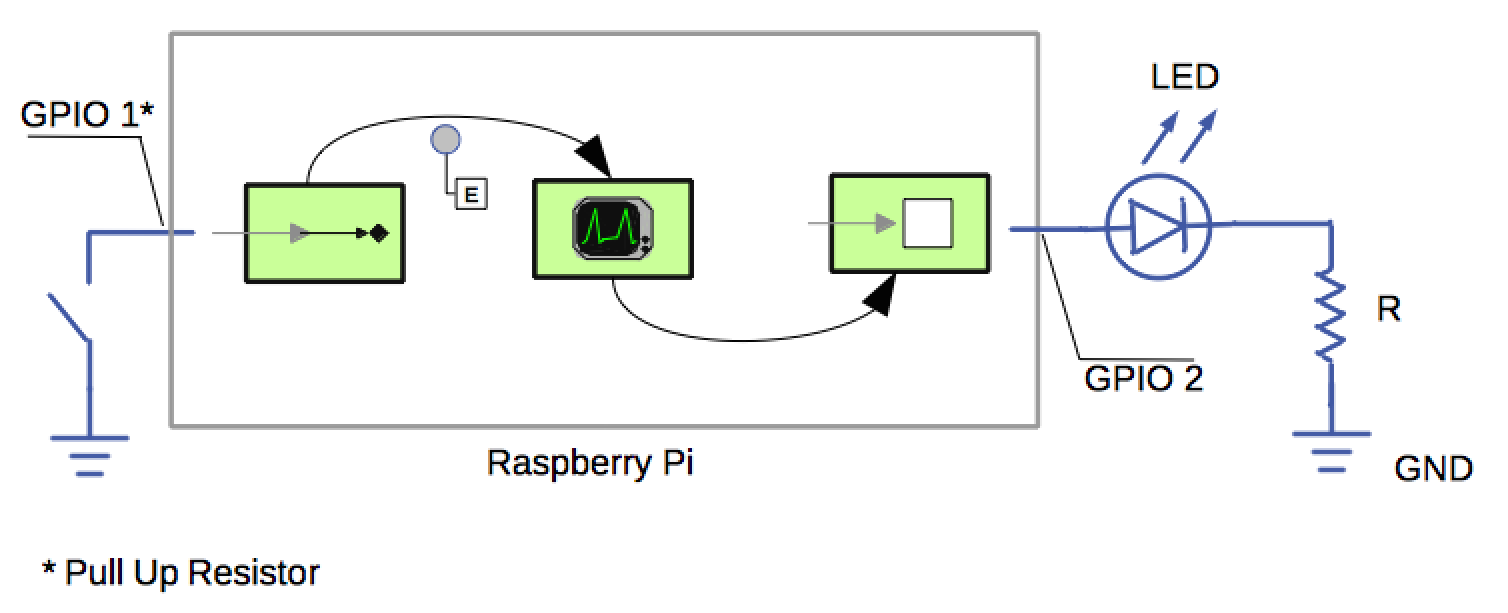
The flow:
- A GPIO consumer listens for button presses on GPIO pin 1
- The Camel route passes button press events to the GPIO producer
- The GPIO producer toggles the LED on GPIO pin 2
Running the Button-LED Example
$> ssh ${PI_USER}@${PI_HOST}
pi@rbpi> pi4j -r com.github.camellabs.component.raspberrypi.CamelMain  \
        "raspberrypi-gpio://1?mode=DIGITAL_INPUT&state=HIGH" \
        "raspberrypi-gpio://2?action=TOGGLE"
This command:
- Creates a GPIO input endpoint that listens for HIGH state events on pin 1 (button presses)
- Routes each button press event to GPIO pin 2 with the TOGGLE action
- When the button is pressed, the LED will toggle between on and off states
Video Demonstration: Button-Controlled LED
Command Line Execution
Understanding the Console Output
When you run the button example, you’ll see detailed logs showing:
- The Camel context starting up
- The GPIO consumer listening for button events
- Button press events being detected
- Messages flowing through the route
- The GPIO pin being toggled
Here’s a snippet of the console output:
2015-03-31 20:09:15,667 [               pool-1-thread-1] RaspberryPiConsumer            DEBUG GpioEvent pin GPIO 1, event DIGITAL_STATE_CHANGE, state HIGH
2015-03-31 20:09:16,089 [               pool-1-thread-1] raspberrypi                    INFO  Exchange[
, Id: ID-rbpi7-46433-1427832539336-0-2
, ExchangePattern: InOnly
, Properties: {CamelCreatedTimestamp=Tue Mar 31 20:09:15 UTC 2015, CamelMessageHistory=[DefaultMessageHistory[routeId=raspberry-pi, node=to1]], CamelToEndpoint=log://org.apache.camel.component.raspberrypi?multiline=true&showAll=true}
, Headers: {breadcrumbId=ID-rbpi7-46433-1427832539336-0-1, CamelPi4j.pin="GPIO 1" <GPIO 1>, CamelPi4j.pinState=HIGH, CamelPi4j.pinType=DIGITAL_STATE_CHANGE}
, BodyType: com.pi4j.io.gpio.event.GpioPinDigitalStateChangeEvent
, Body: com.pi4j.io.gpio.event.GpioPinDigitalStateChangeEvent[source=com.pi4j.io.gpio.RaspiGpioProvider@aa952c]
, Out: null:
]
2015-03-31 20:09:16,152 [               pool-1-thread-1] RaspberryPiProducer            DEBUG Exchange[Message: com.pi4j.io.gpio.event.GpioPinDigitalStateChangeEvent[source=com.pi4j.io.gpio.RaspiGpioProvider@aa952c]]
2015-03-31 20:09:16,153 [               pool-1-thread-1] RaspberryPiProducer            TRACE action= TOGGLE
Notice how the consumer detects both the button press (HIGH state) and release (LOW state), but only processes the HIGH state events as configured.
Conclusion
Integrating Apache Camel with Raspberry Pi creates a solid platform for IoT development:
| Criteria | Benefit |
|---|---|
| Integration | Camel’s connectivity options (HTTP, MQTT, AMQP, etc.) connect the Raspberry Pi to external systems |
| Messaging | Camel’s routing, transformation, and error handling apply to IoT applications |
| Scalability | Simple prototypes scale to complex solutions using the same stack |
| Extensibility | I2C and SPI support (coming soon) enables connections to a wide range of sensors and actuators |
Potential applications include home automation, environmental monitoring, industrial control systems, and sensor data collection integrated with business systems.
Additional Resources
- More information about me
- Colleague’s blog: Henryk Konsek (IoT, MQTT, etc.)
- CAMEL-8567 JIRA issue — Track the Raspberry Pi component progress
- GitHub Pull Request — Code changes for the component
- Pi4J library
- Raspberry Pi
- Apache Camel